


Thematic
Hover over the thumbnail for a full-size version.
| Author | Hellheart |
|---|---|
| Tags | action author:hellheart playable rated |
| Created | 2005-05-12 |
| Last Modified | 2005-05-21 |
| Rating |
4 by 7 people.
|
| Map Data | |
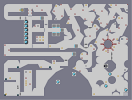
| Description | I am really proud of this map; after about 7 hours of creating, testing, and refining, I think I have a map that's not so difficult as to make you stop in frustration, but challenging enough to be noteworthy.
Partial completion demos are fine, I'm working on a completion after I submit; I've tested everything, it's all possible, even the gold on the platform above N's start. If anyone manages an all-gold demo (don't frame-by-frame, please), I owe them a seriously good dedication map in a style of their choice. Read my first comment for particularly troublesome parts that you should run individually before trying a full run. Edit: Removed a single tile to make the path from the first switch to the first thwump easier to stomach. Removed the immense pile of gold, which made running anything with mines annoying as hell. Moved one of the mines - located to the right of the final switch in the minefield - 1/4 snap to the left. Going up is now half as hard. |
Other maps by this author
 |
 |
 |
| 5-O Diamonds: Precision | Single Tileset Motifs: Brambles: Collection | Single Tileset Motifs: Gridlock: Collection |
Comments
Pages: (0)
2005-05-12
Partial Demo
From start to the beginning of the minefield. Don't watch unless totally stumped or you don't believe a part is possible.
| Demo Data |
|---|
2005-05-12
Tight Spots
1. The final floorguard jump before the switch. You need speed here
2. The 3-mine cluster after the first thwump. Least it ensures that if you make it through, you'll be going fast enough to beat the second thwump.
3. The downward jumppad may kill you if you aren't careful. Prepare to hug the wall, and to jump if you drop to the floor.
4. The fall from where it starts getting jagged to in front of the thwump, in the center of the map.
5. For those who haven't gotten past Jagged yet, the spike leading to the first switch in the minefield.
6. The 3-mine group to the right of the final switch in the mines, going both up and down. Up is particularly hard, but possible.
7. Dropping to and through the first locked door. This is definately something you want to figure out before you do a run.
8. Getting to the door after it's opened requires a bit of patience and planning.
Hellheart
Continuation
This goes up to the second minefield switch.